Showing posts with label Crafting. Show all posts

Friday, November 9, 2012

The Shelves Saga Continued

I got the screws out but since the boards were very solidly installed I hired a handyman to come rip them down and rip he did, it looks so much better already!


Time to patch, prime and paint now.
The green is the original house color, at least I'm pretty sure it is.


Saturday, November 3, 2012

Steampunk Pumpkins-Now a Yearly Tradition

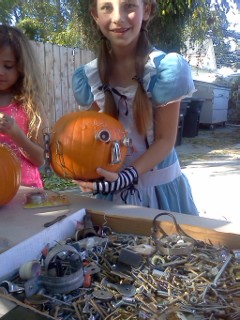
This is our second year doing steampunk pumpkins with Libby Williamson of Blue Denim Design.  She held the seminar at Dragonfly Shops and Gardens this year and it was a blast.  Can't wait for next year!


Wednesday, June 13, 2012

Trash to Treasure: Workbench to Potting Bench

Driving home I spied a house being cleared out for sale about a block from my house and on the driveway sat this ugly, beat-up, crumbling topped workbench.  So of course I stopped and asked if I could have it!!!!

I ran home, grabbed my sister in law who happened to be there and said come on, treasure alert!  She was not really pleased to help me bring home this ugly beast.  Since my husband is her brother she was worried about what my hubby would say.  He's told her before not to enable my junkin' :)  But I told her she had to!!!!  Here's what it looked like before.


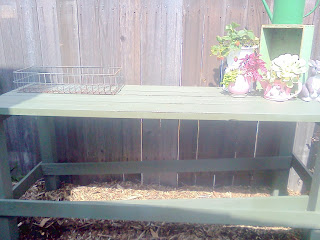
Here's what it looks like now!
Under the crumbly press board top was perfect pine 2x4's!


I removed all of the extra screws / boards / nails and the broken back and then just slapped a couple of coats of paint on it!

I went 'shopping' in my garage and garden and pulled together a vignette


I love it! It is clearly visible as you drive down the street so I kept the color subdued...I think my projects already freak the neighbors out quite enough and this blends in with the side vegetable garden.


I plan to put my soil containers and maybe a shade plant or two under the bench.  Or I may add boards to make a second shelf.  Who knows, but for now it is awesome!!!!

Thursday, May 31, 2012

Happy Heart Studio: Design Memory Craft Blog Candy!

Oh yes, I love blog give-aways! I don't do them on my blog (yet) but my friend Nancy is doing a giveaway!!!!!!

I love Gelatos and Nancy, so this is a double happy blog to hop over to!


Happy Heart Studio: Design Memory Craft Blog Candy!: Since Jill Foster at Inspired by has been inspired by me, it seems only fair to return the favor. So I made my own version of her gorgeous ...

Wednesday, May 30, 2012

Flowers from the Garden

On Saturday mornings, it is my little ones 'chore' to deadhead the flowers in the garden and collect bouquets to bring inside the house.  Each week I see her improving on her arrangement skills, and she is starting to look forward to this part of the week.  I usually don't have to remind her as the previous weeks arrangements start to look time-worm, she'll remind me that she is going to slip out into the garden on Saturday morning to make new arrangements.  Currently blooming is a ton of Shasta Daisies and Carnations, but the roses are starting to open along with the occasional camelia, gardenia and hydrangea...

  Here are this weekend's flowers from the garden...

My father-in-laws old tool box filled with tin cans of Shasta Daisies and a flag to celebrate his memory and service to our country in WWII

Shasta Daisies and she added a bright red ribbon for Memorial Day

On the left are celery blossoms and on the right are hydrangeas

Hydrangeas

Celery Blossoms


For the kids table at the Memorial Day BBQ she used Dusty Miller Seed Pods and Shasta Daisies.

What is blooming in your garden?

Wednesday, May 23, 2012

Dirt, Martinis and Wine Corks, oh yeah!

I have so many things to post about!  This time of year I am out in the garden every day moving things, playing with the chickens and watering, watering, watering.

Here are a quick couple of pots I changed up based on inspiration from fellow gardener DirtandMartinis.  She had utilized wine corks and piled them up around a plant to use as mulch.

I loved that idea and told her I was gonna do it myself!  For mine, I decided to try putting the corks into a pattern. I played with a few but the circular pattern worked the very best.  Then I grabbed a container of small stones which I had scored for .50 at the Orange Rotary rummage sale (yea, for rummage sales!).  These were nice small pebbles in the original packaging from Pier 1 and they certainly did not start out costing just 50 pennies :)

Plants are: rosemary and pineapple sage

Rosemary-my other rosemary was lost when the plumber replaced our main line, so this is just a teeny little baby that I plan to grow into a huge monster as fast as possible! Rosemary cuttings are wonderful skewers that I use all.the.time.

Pineapple Sage is one of my favorite herbs to grow, the pineapple-i-ness is really strong and I really don't even think there is a sage flavor.  This was also a plant I lost when the plumber replaced our main line so I am making do this year with a small plant.  My other plant was 4 feet tall and 3 feet wide and it only stayed that size because I was constantly cutting it back. The hummingbirds love the red flowers, it grows quickly and easily, cuttings root easily, and I use it to make a simple syrup to sweeten sun tea during summer and in stir fry.  My plan is to grow this into a huge plant, although I'm not sure how it will do in a container, anyone have experience with this?  I had it by my hose before and it just loved the drip drip drip irrigation from the leaky spigot. 


I think my containers look nice and tidy now!


My $8 Front Porch Spruce Up

My front porch was looking a bit sad.  There was something gooey stuck on the tile that I'm sure was grody-ness leaked from the trash being taken out and I was using it to paint furniture so there were tools, tables and furniture strewn about, garden gloves, etc.

I don't always bother with the 'before' but here is my $8.00 Front Porch Make-over!  It was simple, inexpensive and really didn't take too long.  The part that took the longest was scrubbing down the eaves and windows and tiles, so now they are sparkling clean again.  I always think it is a bit sad to go to someones house and the front porch is dirty.  I don't know why this bothers me more than a completely destroyed house with a sink full of dishes, but it does.


The idea was that I wanted to change out a few things for summer and I go with the good ol' red, white and blue from Memorial Day until Labor Day.  So the first thing I did was make a pool noodle wreath.  Here was my inspiration photo from Pinterest (click on it to go to the source) and below is my actual wreath.  Total cost for the wreath was $4.00.  I used red felt, a pool noodle from the dollar store and the freedom sign was from the dollar store also.  The source link is a great blog and has all of the instructions.  She used red burlap, but I couldn't find it, so I just went with felt and it looks good to me!


Next up, I looked around to see what I had that would work in the color scheme as far as plants and pots go.  I had three elephant bush cuttings that were in blue pots so I moved those from the side yard onto the rusty wire bench.  (Zero cost, love that!)


Then, I realized I had this great galvanized container that my nephew had brought me from a  yard sale.  I took out my hammer and 1 big nail and poked holes in it for drainage.  (Note: this is really loud!  So don't pound on galvanized metal early or late at night.)  I filled it up with leftover potting soil, some composted rabbit manure and whatever else I had on hand.  I wasn't too concerned with this soil lasting for years, it is just for a few months with seasonal color.  I purchased a 6-pack of Celosia for $1.72.  I chose those because they look like red fireworks and should last all season long.  When I chose the 6-pack I chose one that had more than 6 plants in it and just carefully separated them.

I also re-potted a dark colored planter I had out back that I used as a sort of garden trash can.  Now I don't have a garden trash can, but I do have a cute potted arrangement for summer. For this I purchased a 6-pack of flat parsley. You can never have too many herbs on hand and I use parsley quite a bit.  I used 3 Celosia's, 5 parsleys and one plant I don't know the name of that was in another pot in the backyard.  Again, the un-identified plant was white and the celosia was red, so I was reinforcing the red, white and blue theme.


Clean and ready for Memorial Day Weekend!


What are your plans in the garden or home this Memorial Day?

P.S.: if anyone knows how to re-paint or remove security doors, let me know.  I hate having them on the house but years ago everyone in my neighborhood was suckered into buying them after a single burglary by a very slick salesman.  And now, they don't sell the tool to take them off at the hardware stores anymore because people were buying the tool to break into houses.  The only way that I know of to get them off is to pay someone and that is NOT happening.  My security door hides all of my hard work repainting my front door chocolate brown last year, and let me tell you repainting a front door takes a ton of work!


Thursday, April 19, 2012

Old Lamp + Tiered Server = New Bird Bath

I am so excited to share this project with you!

A few months ago, my friend Karli from Style{d} had a huge sale of her vintage props which of course I went to!  I scored a lovely little vintage lamp with crystals dripping from it.  It needed to be re-wired and it had no shade, but it still had it's harp and finial and so I snatched it up.  


And then, it sat in my garage.  For those that know me, I am not a hoarder.  In fact, I have no problem tossing anything, but this piece was awesome so I allowed it to sit in my garage for months and months.  I had no plan for it but I knew it belonged in my life.   I finally decided to make a bird bath out of it using another old tiered serving stand.  Here's how I did it.


Here's the finished product, read below to get the instructions.


Step 1: Identify all of your parts. This tiered server worked out perfectly.  I do not have the ability to drill through glass and by using a tiered server the holes were already drilled.  Otherwise, for me, this project would have been a no-go.


And the lamp


Step 2: Start taking apart the lamp.  Take off the finial and harp.


Step 3: Take off the light switch.  Just turn counter-clockwise until the screw is exposed.


Step 4:  See the pink tip of my paint can opener / screw driver.  I am unscrewing a tiny screw that was holding the lights wiring in place.  Take that off.


Step 4: Pull gently and the lighting wiring should come off.  (Yours may have more screws / nuts and bolts on the other end but the cord had already been cut on this baby since it was used for photo styling and not in real life.

Step 5: Take apart your tiered server.  Most of these come apart quite easily so they can pack flat for storage and this was no exception.  It came apart quickly and easily.


Unscrewing the top


Removing the rubber gaskets and washers


Unscrewing the bottom screw

Step 6: Dry fit your parts together.  In my case, after I dry fitted them I realized I needed a piece of all thread and some nuts to put it back together so I went to True Value and for $2.36 I got the long piece of all thread and some nuts.  Here is where my picture tutorial totally goes kaput.  My all thread was longer than needed and the guy at the hardware store said to put it together and then cut it off.  Um, yeah, didn't work so well.  Needless to say, please dry fit all the parts together and make sure they are the appropriate size before you break out your glue.  Or you will have to take it apart and do it again.  Your husband will have to come and help you saw through the all thread with wire strippers because that's all you have in the way of tools and then you'll have to bend the rod until it snaps.  I did that part myself and felt like a super-hero, it was awesome.

I also realized at this point that the top of the server looked cool turned upside down but I also needed the bird bath to be a little higher for looks.  I punched a hole in a canning lid and built up the level that way.  I also used some socket wrench pieces that I had lying around to make it taller.   At this point, use what you have.


See how I added the top tier upside down and the canning lid is resting on a socket wrench piece.


Here is how it looks from the top.

Close-up of the canning lids stacked in there on top of the socket wrench piece.


When I set it in the garden and filled it with water, it fell over.  Lesson learned is to make sure it is level.


Filled with water.

Starting to tip


Kaput-at least it didn't break! 

I dug out the grass, and nestled it down in about an inch.


Filled with water and holding steady. We'll see what happens when the chickens and birds get in it!