My new 102 year old house, working on the urban farm. Rabbitry, Aviary and gardens are all up and running aftrer the move and happily producing
Showing posts with label DIY. Show all posts
Wednesday, January 21, 2015
New House, New Urban Farm
Labels:
DIY,
Gardening,
Meat Rabbits,
Orange County,
Rabbits,
Urban Farming
Friday, November 30, 2012
Making Homemade Extracts
Never tried this before, but I did it and so can you, it was really easy!
I made the following extracts:
Mint
Orange
Lemon
Vanilla (still brewing to full strength)
Instructions for Mint Extract:
Gather, wash and dry mint leaves-1 cup of leaves
Pour vodka over the mint in a sterilized / clean jar-1 cup of vodka
Shake and let sit for 2 weeks
Strain the mint leaves out, discard
Pour into a pretty jar. I ordered mine from Mountain Rose Herb Company, click on the picture to check out their company.
Pour vodka over the peel in a sterilized / clean jar-1 cup of vodka
Shake and let sit. Unlike the mint you don't have to strain it out in any hurry, you can leave it for a month or two. I left mine for a month and then strained it into the pretty bottle. Some recipes you just leave the peel in there forever and add vodka as you want to make more extract. I would rather start with a clean batch each time.
FYI, I did a taste test on the Orange Extract since I still had some of my Watkins Orange Extract in the pantry and I could NOT tell any difference in flavor so no more bottles of 5.99 for an ounce of extract! I made 8-16 ounces of each extract and even factoring in buying the bottles, vanilla and vodka I still made these for a fraction of the cost. (Plus someone left a bottle of vodka at my house after a party so I didn't even have to buy the vodka! I just used what I had.)
Vanilla Extract
Hands down I use Vanilla Extract the most out of any extract, with Orange Extract being a close second so even though this vanilla extract did cost me $ to make I can make much more quantity than I can buy for the price.
For the vanilla extract you pour vodka over several split vanilla pods and then let it develop over a period of about 6 months. You can use it at anytime but it gets stronger the longer it ages, so this one I'm still waiting to use. I have it sitting in my baking pantry in a large mason jar and I still have about 4 more months before I think I'll try using it, I want to make sure it is good and strong.
I purchased a vial of vanilla pods from Mountain Rose Herb Company for $7.00 and I only used half of them to make 16 ounces of extract. Click on picture to go to their website and order.
I made the following extracts:
Mint
Orange
Lemon
Vanilla (still brewing to full strength)
Instructions for Mint Extract:
Gather, wash and dry mint leaves-1 cup of leaves
Pour vodka over the mint in a sterilized / clean jar-1 cup of vodka
Shake and let sit for 2 weeks
Strain the mint leaves out, discard
Pour into a pretty jar. I ordered mine from Mountain Rose Herb Company, click on the picture to check out their company.
Instructions for Citrus Extract (I made 1 lemon and 1 orange)
Gather a few oranges, lemons, or other citrus (depending on the variety you're making)
Zest / Peel the skin only off of a few fruits. You want to be careful not to get the white part because it will make your extract very bitter.
Shake and let sit. Unlike the mint you don't have to strain it out in any hurry, you can leave it for a month or two. I left mine for a month and then strained it into the pretty bottle. Some recipes you just leave the peel in there forever and add vodka as you want to make more extract. I would rather start with a clean batch each time.
FYI, I did a taste test on the Orange Extract since I still had some of my Watkins Orange Extract in the pantry and I could NOT tell any difference in flavor so no more bottles of 5.99 for an ounce of extract! I made 8-16 ounces of each extract and even factoring in buying the bottles, vanilla and vodka I still made these for a fraction of the cost. (Plus someone left a bottle of vodka at my house after a party so I didn't even have to buy the vodka! I just used what I had.)
Vanilla Extract
Hands down I use Vanilla Extract the most out of any extract, with Orange Extract being a close second so even though this vanilla extract did cost me $ to make I can make much more quantity than I can buy for the price.
For the vanilla extract you pour vodka over several split vanilla pods and then let it develop over a period of about 6 months. You can use it at anytime but it gets stronger the longer it ages, so this one I'm still waiting to use. I have it sitting in my baking pantry in a large mason jar and I still have about 4 more months before I think I'll try using it, I want to make sure it is good and strong.
I purchased a vial of vanilla pods from Mountain Rose Herb Company for $7.00 and I only used half of them to make 16 ounces of extract. Click on picture to go to their website and order.
Other helpful hints:
While googling the heck out of extract making I thought it was a pretty cool idea that some people had to use mini liquor bottles to try and make their vanilla extract with different rums, etc. I suppose that would flavor differently and the little bottles look cool and you don't have to invest in a large bottle of any one liquor, so that seemed like a good idea.
Almond Extract
I wanted to make almond extract but based on my research, if you poured vodka over the type of almonds we eat, it would never develop a true almond extract flavor. The type of almonds used in extract making are Marcona almonds and they are not allowed to be sold to the general public as they are considered poisonous. Interesting, huh! So I'll still be buying almond extract as my husband uses it quite often to make his Italian cookies.
Tuesday, November 27, 2012
Painting Stripes on My Wall-Pinterest Fail!
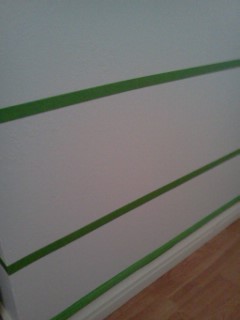
So I've been inspired on good ol' pinterest to paint stripes on a wall. I have a tiny very simple wall in the entrance to my master bedroom that I thought would be perfect to try my paint stripe technique on. Small enough that I could do the job easily and it was such a boring wall that it needed something.
I've seen all over the pinterest boards how folks were painting a matte base and then painting the same color of paint in a gloss. They must have not used the exact same color because that's what I did and I can only see the stripes when the light hits just right and even then it's questionable. But...here's how I did it
I had to figure out how to tape the wall so I measured the wall and figured out I could do 12 inch stripes with a 9 inch opening...
Gathered my measurements and materials:
I've seen all over the pinterest boards how folks were painting a matte base and then painting the same color of paint in a gloss. They must have not used the exact same color because that's what I did and I can only see the stripes when the light hits just right and even then it's questionable. But...here's how I did it
I had to figure out how to tape the wall so I measured the wall and figured out I could do 12 inch stripes with a 9 inch opening...
Gathered my measurements and materials:
Here's my drawing of how the stripes would work with the measurements
I made notes of where the tape would go, that came in very handy because the tape isn't evenly spaced. You need to tape off in a way that where your paint goes is the right size so you need to take that into consideration.
Once you've got your tape up, the painting was easy, but can you even tell I painted? Yeah, me neither. It was about an hour total plus the extra quart of paint and the tape, so about a $20 project fail :) I've definitely had worse DIY fails. At least this one is so unnoticeable I don't have to fix it and what I learned is that painting stripes is not bad, just takes a bit of patience. I think now I'll do stripes again someday but in contrasting colors instead of the exact same colors.
Thursday, November 22, 2012
Friday, November 16, 2012
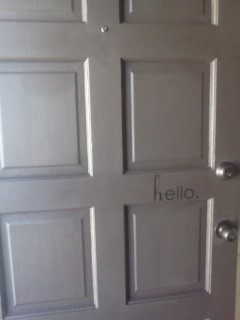
Shut the Front Door-Before and After
3 cans of stripper+16 hours of an arm workout+1 quart or primer+1 quart of paint+1 vinyl Hello decal =
But not before it had looked like this
I also ORB'd the hardware! That was awesome! But for another post....
But not before it had looked like this
I also ORB'd the hardware! That was awesome! But for another post....
Friday, November 9, 2012
The Shelves Saga Continued
I got the screws out but since the boards were very solidly installed I hired a handyman to come rip them down and rip he did, it looks so much better already!
Time to patch, prime and paint now.
The green is the original house color, at least I'm pretty sure it is.
Monday, November 5, 2012
Living Room Wall Redux
I've been pulling out the screws that have 50 years of paint and bondo on them one at a time. My goal is to take out 4 screws everyday until I get these shelves out of here. Yes, they take that long :)
My goal (fingers crossed) is to get these shelves down and the ceramic tile torn off to expose the brick fireplace that is under there. Wish me luck!
I hate hate hate these shelves. First my living room ceiling is sloped but whoever put these in put 4 shelves on one side and 3 shelves on the other. It just emphasizes my weird slanted ceilings.
Then, these don't go all the way to the floor, they're not really 'built-in' looking and they overlap on the fireplace and mantel. I don't have OCD but boy oh boy that drives me crazy.
My goal (fingers crossed) is to get these shelves down and the ceramic tile torn off to expose the brick fireplace that is under there. Wish me luck!
I hate hate hate these shelves. First my living room ceiling is sloped but whoever put these in put 4 shelves on one side and 3 shelves on the other. It just emphasizes my weird slanted ceilings.
Then, these don't go all the way to the floor, they're not really 'built-in' looking and they overlap on the fireplace and mantel. I don't have OCD but boy oh boy that drives me crazy.
I also hit my head on the very sharp corners. I'm short, these shelves are at a dangerous height.
Say goodbye to the shelves!
Saturday, November 3, 2012
Steampunk Pumpkins-Now a Yearly Tradition
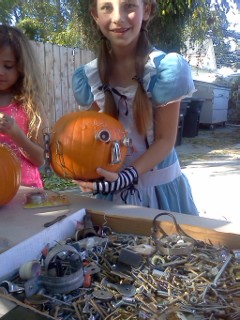
This is our second year doing steampunk pumpkins with Libby Williamson of Blue Denim Design. She held the seminar at Dragonfly Shops and Gardens this year and it was a blast. Can't wait for next year!
Tuesday, October 23, 2012
How did I dye those lamp shades
Some folks asked how I dyed the lamp shades in my daughters room. Here's how I did it:
Outside of the house in the sun! (important)
I took an old plastic container and added a few gallons of water
1 bottle of black RIT dye
some salt-couple of cups
Then I lowers in the lampshades and carefully saturated them without splashing myself with the color.
I turned them a few times and let them soak for about an hour on each side.
Then I carefully rinsed them with the hose to check the color.
They were perfect. These were antique silk lampshades so they didn't get that dark especially because I couldn't use heat, it would have dissolved the glue holding the lamp shade together and there was delicate silk ribbon embroidery and bead detail that I didn't want to risk.
I loved how they turned out!
Friday, October 19, 2012
Make it-Citrus Enzyme Cleaner
Make your own enzyme cleaner for about 30 cents. Yes, you can do this!
Enzyme cleaner is very handy to have around and at around $10 a bottle from the health food stores it is worth the time to make your own, especially because it is super simple:
Ingredients
2 cups of citrus peels
1 liter of water
1/2 cup of brown sugar
1 teaspoon of yeast
Mix the ingredients by giving them a good shake in an old bottle.
Set it on the counter but LEAVE the lid slightly open. This will ferment, develop and EXPLODE if you close the lid tightly.
Keep it near your sink or somewhere you can see it for the first two weeks. Shake it when you go by, after tightening the lid of course :) Then make sure you re-loosen the lid.
After two weeks, strain it into a clean bottle or jar and use it around the house.
Full strength as an insecticide!
Diluted it is wonderful for cleaning gross stuck on stuff
Super diluted it is great for all purpose cleaner
Enzymatic cleaners are also good for pet stain clean up but test an area first.
Also if you have asthma don't spray this in the air, pour it on a rag to use.
If you are like me you should have multiple batches on hand, it gets used quick.
Also, I've learned to keep a baggy of orange peels in the freezer and whenever I have enough I start a new batch of cleaner.
Friday, October 12, 2012
When good ingredients go bad
My recipe for wheat bread is simple:
Wheat Flour
White Flour
Yeast
Honey or Agave Nectar
Milk
Butter
Salt
However, this bread would NOT rise! I'm guessing my yeast is past its prime :(
I make bread weekly so I buy a large quantity of yeast from Smart and Final about once a year. It's about $5 for a pound of yeast and it lasts about a year in my fridge. This batch of bread told me it was time to buy a new bag of yeast!
Thursday, September 20, 2012
Finally finished the bedroom makeover
I finally finished my little one's bedroom makeover!
I...
painted the walls: Pink Sea Salt
Painted the iron wall art: Black
Dyed the lamp shades from my thrift store lamps white to dark grey
Painted the lamp black
Sewed a new cover out of pink damask super soft flannel for the headboard (Thank you Fabric Land of Orange for the awesome sewing lesson in which we completed this cover in 1 night!!!!)
Repaired and painted old nightstands that were passed down to me.
Still need to put up her new blind under yje white curtains and add the black bow tie-backs, but I feel like I can call it done.
Subscribe to:
Posts (Atom)